ooooooooooo

BDRAG, JUST CHECKIN IN....

BDRAG

Well-known member
Lifetime Member
Joined
Aug 26, 2018
Messages
720
Points
93
Location
DALLAS AREA
Roxor Ownership
No longer own
Roxor #
:-(
Test fit wheels and tires. I have only found my front tires. Rears on order still. So I mounted the fronts on the front and rear to see how large the flairs will be.

The rears will be 2-1/2 wider than pictured. :)

Looks like front flairs will be 3" minimum and rears will be 4"-5" wide. SWEEEEEET!

BDRAG
 

Attachments

  • PXL_20211021_202730970.jpg
    PXL_20211021_202730970.jpg
    332.1 KB · Views: 179
  • PXL_20211021_204234651.jpg
    PXL_20211021_204234651.jpg
    447.1 KB · Views: 162
  • PXL_20211022_154246336.jpg
    PXL_20211022_154246336.jpg
    357.3 KB · Views: 140
  • PXL_20211022_154232817.jpg
    PXL_20211022_154232817.jpg
    300.1 KB · Views: 147
  • PXL_20211022_154310555.jpg
    PXL_20211022_154310555.jpg
    213.7 KB · Views: 139

BDRAG

Well-known member
Lifetime Member
Joined
Aug 26, 2018
Messages
720
Points
93
Location
DALLAS AREA
Roxor Ownership
No longer own
Roxor #
:-(
Well I could not wait till 2022 for the rear tires that match the front tires. So I went with what was the size I wanted, just not same brand. I had to have the tire so when I get the 4 link, coil over, brand new John's Industries 9" Ford rear end in, I will have the right tire to build the rear flairs to.

I have ALL the suspension parts in now. So there are no more excuses to not get rolling full steam ahead. In all these boxes on the floor are $10k worth of under car parts. Complete, NEW, front and rear suspension sub structures. Double adjustable coil over shocks, frame connectors, 12" rotors front and rear, new spindles, 4 piston calipers.

All I have done inside the car is cutting into the seat structure box area and clean out all the debris and rust. Welded a 2" square patch in one spot. Painted over all the rust and then made screw in, removable cover plates to close it back out.

Definitely gonna need some to fab some B I G A S S flairs. Lol.

BDRAG
 

Attachments

  • PXL_20211030_153501195.jpg
    PXL_20211030_153501195.jpg
    307.9 KB · Views: 154
  • PXL_20211026_193331742.jpg
    PXL_20211026_193331742.jpg
    312.6 KB · Views: 133
  • PXL_20211026_193446933.jpg
    PXL_20211026_193446933.jpg
    352.5 KB · Views: 142
  • PXL_20211026_193904438.jpg
    PXL_20211026_193904438.jpg
    152.4 KB · Views: 132
  • PXL_20211019_200935406.jpg
    PXL_20211019_200935406.jpg
    376.9 KB · Views: 142
  • PXL_20211031_221215241.jpg
    PXL_20211031_221215241.jpg
    340.9 KB · Views: 156
  • PXL_20211031_221220084.jpg
    PXL_20211031_221220084.jpg
    328 KB · Views: 153

BDRAG

Well-known member
Lifetime Member
Joined
Aug 26, 2018
Messages
720
Points
93
Location
DALLAS AREA
Roxor Ownership
No longer own
Roxor #
:-(
Latest work:

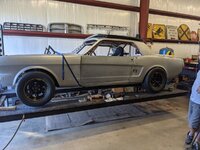
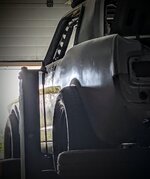
Well, finally got started pulling the rear end and leaf springs out so I can start the rebuild of the suspension tie in mounts.

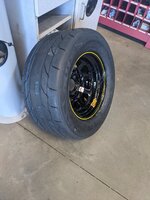
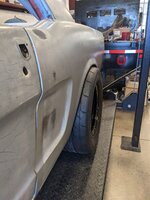
The car at some point in it's last few owners / HACKERS, decided to install wheel well tubs to allow wider tires to fit under the existing body. They installed some CRAPPY leaf spring mounts on the inner surface of the rear sub structure, also installed some rest leaf spring mounts that side step the rear frame moving the leaf springs inside the frame from outside allowing for the needed tire clearance.

The first issue removing all this was the bolts in the rear mounted the aftermarket mounts from outside direction. Some how they got a bolt in that won't come out without hitting sheet metal before it comes out. So we had to torch that bolt off.

Then we cut off, twisted off the front leaf spring mount boxes that were only held on by a few real bad welds. Once off I could see just how bad the frame area behind these mounts was. So I fabricated doubler plates to weld over the frame for strength. I chopped one of the mount boxes up to fabricate the plates to replace the removed OEM leaf spring mount that were located on the outer area of the frame originally. Why they cut these off when they did not inter fear with the crap they put on the other side of the frame is beyond me.

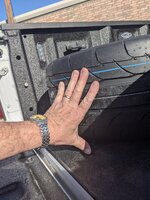
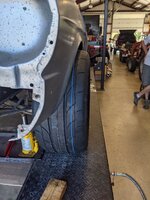
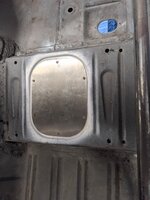
So we got the leaf springs off and out along with all the mounts. Then we removed the tires which we had left on to support the rear end upon spring removal. Once the wheels were off we were discover a tin sheet metal plate wrapped around the bottom and outer box frame section. This was pop riveted on with 8 aluminum pop rivets and had been under coated. So I drilled off the tin plate. WE WERE HORRIFIED by what we saw under the tin plate!


Some DUMB A S S in the past decided to CUT AWAY 75% of the rear sub frame tubing during the inner wheel well removal. Basically, the only part of the rear frame holding up the car was the inner surface of the rectangle frame tube. A slight edge was on the top and about an inch of the bottom portion was still there. Both sides of the car were done like this. WOE!


This was such an unsafe modification, had the previous owners put it on the road, some one could have suffered from a catastrophic failure. OMG!

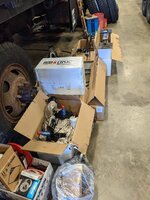
So I decided that my repair would consist of replacing the missing material by installing a section of rectangle steel tube with an 1/8" thick wall. I went to the local steel warehouse that has a great supply of drop material on racks in their small show room / sales office.

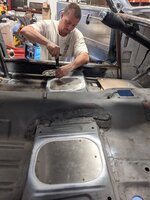
I found some 3" x 1-1/4" x 1/8 wall tubing drops. Once back I cut them about 3 inches longer than the missing portion of the frame. I then slid them inside the remaining sub frame. Looked like it will work. So I removed the tubing which was about 1/8-1/4" narrower that the frame tube. I then slit the frame tube at the top and bottom about an inch back so once the new tube was in I could fold this section down onto the new tube surface and weld it all in. This worked great, but what a PAIN IN THE ARSS!

What else are we going to find that's so wrong????

So we got the repairs done and got the then used the new rear ends 4 link bottom trailing arms to locate and weld in the new replacement brackets we made to re install to chassis in the OEM position.

So the next step is to get all the repairs welded in 100% and clean and dress it up with new paint and undercoating. Then we can install the lower links, then the rear end housing and mounts to these links and can locate the coil over spring mounts and upper trailing links. What a pain in da butt! Lol.

So basically we rebuilt the entire rear suspension tie in points and repaired the frame sections that were HACKED OUT so we can now attach our new components in this repaired area of the frame. Yep, the damaged/ removed sub frame is right where the new rear suspension is to tie in to mount the coil over springs to.

SO this took an hour job and turned it into a 10 hour day. Lol.

More to come as we progress. What else will we find that's *¥#k d up?????

BDRAG

PXL_20211117_175619445.jpg PXL_20211117_202954994~2.jpg PXL_20211118_002458754.jpg PXL_20211118_002423644.jpg PXL_20211118_002509439.jpg PXL_20211117_175607826.jpg
 

BDRAG

Well-known member
Lifetime Member
Joined
Aug 26, 2018
Messages
720
Points
93
Location
DALLAS AREA
Roxor Ownership
No longer own
Roxor #
:-(
Today's update:

Finished up welding on the replaced OEM rear leaf spring forward mounts. Installed the new rear trailing arms. Assembled the rear ends mounts for where the trailing arm attaches to the rear end.

Got the coil overs attached to same mounts. Started fitting the upper coil over mounts bar.

That's when the provided mounts for the cross bar don't even come close to fitting the mangled sub frame the previous owners left me. Lololol. Errrrrrrr.

Yep! It looks like that at some point in it's life, the car took a hard rear hit. So the sub frame is not even near a straight rectangle tube anymore. The saddle type mounts will not slide over the frames. So I have cut off the back side of the u shaped channel mounts which basically turns them into l angle mounts. Once located I will go back and weld the removed portion back on. I am also adding some bolts through the frame for fit. Once it's all in I will weld it all in to frame rails.

Soooooo that was my 4 hours worth today.

BDRAG

PXL_20211121_173203177.jpg PXL_20211121_173210735.jpg PXL_20211121_180624782.jpg PXL_20211121_202331345.jpg PXL_20211121_205522040.jpg
 

BDRAG

Well-known member
Lifetime Member
Joined
Aug 26, 2018
Messages
720
Points
93
Location
DALLAS AREA
Roxor Ownership
No longer own
Roxor #
:-(
Latest as of 11/28/21:

Got all the rear suspension components and new rear end fit in the car. Got it all tack welded in.

We removed the coil springs from the shocks and ran the tear end through it's lowest position, hanging by all the components and then collapsed it or raised it to the shock limits. Looks like I have about 5-1/2 inches of travel.

So today we pulled it all out. My buddy Pete welded all the brackets and component mounts. While he did that I dug out all the rear brake components and 3rd member stuff.

We then cleaned out the new rear end housing after all the crap that got in it during the fit and gab process. Then we pounded in the axle seals. Then flipped the housing on it's back, laid the bead of RTV to seal the 3rd member to the housing. Then dropped the 3rd member on the studs and torqued it all down and cleaned off all the spooging RTV.

Then got the new E-brake backing plate and axle retainers that came with the Wilwood brakes and got the axles installed. Then bolted down the brake backing plates and axle retainer plates. Then we stuck the rotors on for a test fit of the 4 piston calipers.

Woohoo hoodoo, looks like we did it right! Lol. The caliper only needs about .035 of shims to center the caliper on the disc.

So now I get to clean up the whole rear area and clean, paint, undercoat anything that can't be done after the rear install.

More to come.

PXL_20211127_213142318.jpg PXL_20211123_180645204.jpg PXL_20211128_230631917.jpg PXL_20211128_230646483.jpg PXL_20211128_230651695.jpg
 

BDRAG

Well-known member
Lifetime Member
Joined
Aug 26, 2018
Messages
720
Points
93
Location
DALLAS AREA
Roxor Ownership
No longer own
Roxor #
:-(
12/02/21 latest.

Cleaned up a rear area under the car. Sealed off all of the seams holes and gaps in any floor pan, fender wells and modified areas. Painted and undercoated it all.

Then did final install of all the rear suspension links and shocks after 24 hours of dry time. Did a pre alignment using frame rails and factory jig holes as reference points. Looks like we are close side to side and front to back. +- 1/6" with no load.

Then I got the new trunk pan I made located and drilled in. The pan take the place of where the OEM gas tank was. It's a 5" deep pan to add structure to rear area as well as be the recess area to mount the fuel cell and fuel pump. I had to do some straightening and clean up around the hole. I then drilled in the pan. Removed the pan, up sized the holes for the threaded inserts that will tie it in. Painted the holes and surrounding area. It's in for fit and fuel system lay out for now but will come back out and get sealed in.

The work continues.

BDRAG

PXL_20211129_203408241.jpg PXL_20211129_203445552.jpg PXL_20211129_203605248.jpg PXL_20211201_205323260.jpg PXL_20211201_210702595.jpg PXL_20211202_010755776.jpg PXL_20211130_183614648.jpg PXL_20211130_192943888.jpg PXL_20211130_194603312.jpg PXL_20211130_195036254.jpg
 

BDRAG

Well-known member
Lifetime Member
Joined
Aug 26, 2018
Messages
720
Points
93
Location
DALLAS AREA
Roxor Ownership
No longer own
Roxor #
:-(
12/03/21 update.

Got the Wilwood 12.2" dia rotors and 4 piston calipers installed and adjusted. Was able to get the caliper within .015 centered on the disc. Took me about 1.5 hours to do the first brake adjust then only about 10 minutes for the second one. I think that's called "learning curve" ? Lol.

Then got the rear wheels on and got the car where it can roll again. Woohoo hoodoo. Lol.

Now on to cutting up the front of the car.

BDRAG

PXL_20211202_194324973.jpg PXL_20211202_194842198.jpg PXL_20211202_195046765.jpg PXL_20211202_194219709.jpg
 

BDRAG

Well-known member
Lifetime Member
Joined
Aug 26, 2018
Messages
720
Points
93
Location
DALLAS AREA
Roxor Ownership
No longer own
Roxor #
:-(
12/10/21 Update:

Been working on the Hand E-brake system. I bought a hand brake off ebay. Ordered a Black one but of course it came chrome. Errrrrrr. Anyway, the way it mounts means it would hang down at least 2-1/2" which will be directly over the drive shaft. So I didn't want the working hanging down along with the cables and then having a gapping hole under it.

So I decided to mount it all above ground so to speak, on top of the tunnel inside the car. So I drilled holes for the cable housing in the rear of the floor pan and then worked the hole to allow some angle towards the center. Installed some rubber bushings in the holes.

After deciding the routing will work, I fabricated a pair of mounting blocks to raise the handle assemble and the cable pull block above the tunnel and to align it with the cable stay block and adjuster.

So I got the assemble hard mounted and the cable stay drilled in and held in for now with cleco's. I installed some adel clamps to keep the cable housings in place. So it's all in place. I won't run the inner cables till we install for a final time.

Next will be the rear brake lines and bias control valve.


BDRAG

PXL_20211210_192246786.jpg PXL_20211210_192313189.jpg PXL_20211210_192319481.jpg PXL_20211210_192319481.jpg PXL_20211210_193549625.jpg PXL_20211208_202111759.jpg
 

BDRAG

Well-known member
Lifetime Member
Joined
Aug 26, 2018
Messages
720
Points
93
Location
DALLAS AREA
Roxor Ownership
No longer own
Roxor #
:-(
12/13/2021 UPDATE:

So the latest project is plumbing the rear brakes since the rear end and Wilwood brakes are all installed on the rear. Last post was dealing with the E-brake cables and handle.

So I started from the rear end and then into the cabin with the rear system. So using stainless braided lines running from the caliper to the rear floor pan area where rear seat use to live.

I made hard lines that go from where the braided lines enter the cabin to a tee on the passenger side of the drive shaft tunnel. The lines then tee off towards the front where the line meets up to the proportioning valve. That's as far as I got. The lines are attached using steel # 8-32 rivnuts and AN aircraft screws and washers to adel clamps.

Next will be the run fwd to the rear master cylinder.

BDRAG

PXL_20211213_210150701.jpg PXL_20211213_210323500.jpg PXL_20211213_210328845.jpg PXL_20211213_210334799.jpg PXL_20211213_210346436.jpg PXL_20211213_210420518.jpg
 

BDRAG

Well-known member
Lifetime Member
Joined
Aug 26, 2018
Messages
720
Points
93
Location
DALLAS AREA
Roxor Ownership
No longer own
Roxor #
:-(
12/15/2021 Update.

Well, started plumbing the brake lines from the master cylinders and the clutch master cylinder. Just got started and one of the two dang flare tool wing nut bolts sheared of it's pin. WTF?

So I spent two hours bending and shaping lines and one hour fixing the dang tool.

I am being lazy and am going to use a union and make it easier to build short assemble as opposed to a one piece may work and may not tube. Lol.

BDRAG

PXL_20211215_201333443.jpg PXL_20211215_201353787.jpg PXL_20211215_203930623.jpg
 

BDRAG

Well-known member
Lifetime Member
Joined
Aug 26, 2018
Messages
720
Points
93
Location
DALLAS AREA
Roxor Ownership
No longer own
Roxor #
:-(
Built some line clamps to keep all the lines parallel and even where needed. I know, a n a l! Lol. From sketch to part in 3 hours. Lol.

BDRAG

PXL_20211216_224223004.jpg PXL_20211216_224341083.jpg
 

BDRAG

Well-known member
Lifetime Member
Joined
Aug 26, 2018
Messages
720
Points
93
Location
DALLAS AREA
Roxor Ownership
No longer own
Roxor #
:-(
Major progress today:

Got the existing front suspension and shock towers removed trashed it.

Upon removing the front suspension, this revealed major frame rot. Ford had a better idea and last a 3/4" deep pocket between the shock tower and a lip on the outer frame.

So I drilled out the spot welds on the frame where shock towers were attached. Then I air chiseled the layers of sheet metal apart, then I plasma cut out the rot and the shock towers.

I repaired the rotted area by inserting a piece of square tube. Welded the repair in and ground down any interfering areas.

Then I got the new cross member lined up and welded in. All the new suspension ties to the cross member as well as the motor.

Very good weekend!!!!?

Merry Christmas to all......

BDRAG

PXL_20211218_180053503.jpg 20211218_121324.jpg PXL_20211218_162249038.jpg PXL_20211218_182322403.jpg PXL_20211218_194933984.jpg PXL_20211218_211231985.jpg PXL_20211218_214813051.jpg PXL_20211218_214803680.jpg PXL_20211219_202338768.jpg PXL_20211219_194531792.jpg
 

BDRAG

Well-known member
Lifetime Member
Joined
Aug 26, 2018
Messages
720
Points
93
Location
DALLAS AREA
Roxor Ownership
No longer own
Roxor #
:-(
Today's 2.5 hours.

Cut out past owners front inner fender hack. Fit new OEM type replacement inner fenders.


BDRAG

PXL_20211221_190548276.jpg PXL_20211221_190559930.jpg PXL_20211221_200454257.jpg PXL_20211221_210046692.jpg
 
Top